These Mini Oreo Cheesecakes are rich, creamy, chocolatey, and perfectly bite-sized for parties, holidays, and easy make-ahead desserts. Made with crushed Oreos, smooth cheesecake filling, and a buttery cookie crust, these freezer-friendly treats are simple to make and impossible to stop eating.
As a chef who loves creating desserts that look impressive but are secretly simple, I can confidently say these mini oreo cheesecakes are one of my all-time favorites. From the very first bite, you get that perfect balance of creamy cheesecake filling and rich chocolate cookie crust—making these mini oreo cheesecakes the ultimate bite sized cheesecake desserts for any occasion.
What I love most about this easy mini oreo cheesecakes recipe is how approachable it is. You don’t need fancy equipment, complicated techniques, or hours in the kitchen. Using a cupcake pan, you can easily create mini cheesecake cupcakes oreo style treats that are perfectly portioned, beautifully presented, and incredibly delicious.
These oreo cheesecake bites are also incredibly versatile. Whether I’m preparing mini oreo cheesecakes for parties, packing desserts for a potluck, or making a quick sweet treat for my family, they always deliver. Plus, they’re freezer-friendly, making them one of the best mini oreo cheesecakes recipe for potluck and parties options you can keep on hand.
From a nutritional standpoint, portion-controlled desserts like these can help manage indulgence while still enjoying something sweet. According to Cleveland Clinic, enjoying smaller portions of desserts can help balance overall calorie intake while still satisfying cravings.
If you’ve ever wanted to learn how to make mini oreo cheesecakes in cupcake pan with consistent, bakery-quality results, this guide will walk you through everything step by step.
Quick Answer
How do you make mini Oreo cheesecakes?
To make mini oreo cheesecakes, place an Oreo in a cupcake liner, fill with cream cheese batter, bake until set, then cool and chill before serving.
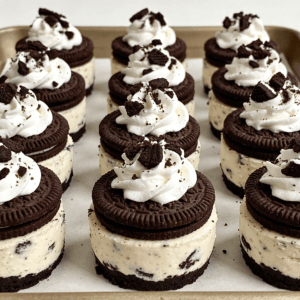
Mini Oreo Cheesecakes (Easy Bite-Sized Dessert Recipe for Parties & Freezer-Friendly Treats)
Ingredients
For the Crust:
- 20 Oreo cookies plus more for garnish
- 4 tablespoons unsalted butter melted
For the Filling:
- 16 oz cream cheese softened
- 1 cup heavy cream
- ½ cup powdered sugar
- 1 teaspoon vanilla extract
- 8 –10 Oreo cookies crushed
Instructions
- Preheat oven to 325°F
- Line a cupcake pan with liners
- Place one Oreo at the bottom of each liner
- Beat cream cheese and sugar until smooth
- Add eggs one at a time
- Mix in vanilla and crushed Oreos
- Divide batter evenly
- Bake 15–18 minutes
- Cool completely, then refrigerate
Notes
Chef’s Quick Notes for Mini Oreo Cheesecakes
1. Use Room Temperature Cream Cheese
Softened cream cheese: creates smoother cheesecake filling and helps prevent lumps in these mini Oreo cheesecakes. I honestly think this is one of the biggest secrets to creamy bite-sized cheesecake texture.2. Don’t Overmix the Batter
Gentle mixing: helps keep the cheesecake filling creamy and smooth without adding too much air, which can sometimes cause cracking while baking.3. Freeze for Cleaner Texture
A short freezer chill: helps Mini Oreo Cheesecakes firm up beautifully while making the texture feel richer, creamier, and more bakery-style for parties and dessert trays.4. Use Full-Fat Ingredients for Better Flavor
Full-fat cream cheese and sour cream: create richer cheesecake flavor and smoother texture that honestly makes these Oreo cheesecake bites taste much more indulgent.5. Add Extra Crushed Oreos Last
Folding crushed Oreos in gently at the end: helps preserve crunchy cookie texture throughout the creamy cheesecake filling instead of letting the cookies become overly soft.6. Use Cupcake Liners for Easy Serving
Cupcake liners: make these freezer-friendly treats easier to remove, store, transport, and serve during parties, holidays, and dessert platters.7. Chill Completely Before Decorating
Fully chilled cheesecakes: hold whipped cream, Oreo crumbs, and chocolate drizzle much better while keeping the bite-sized desserts looking cleaner and more professional.8. Freeze Extras for Quick Desserts
Mini Oreo Cheesecakes freeze surprisingly well: which makes them perfect for make-ahead party desserts, holiday baking, and easy sweet treats whenever dessert cravings hit.Recipe Overview
- Best For: Parties, potlucks, bite-sized desserts, make-ahead treats
- Course: Dessert
- Cuisine: American
- Skill Level: Beginner
- Difficulty Level: Easy
- Prep Time: 15 minutes
- Cook Time: 18 minutes
- Total Time: 33 minutes
- Servings: 12 mini cheesecakes
- Main Ingredients: Oreos, cream cheese, sugar, eggs
Nutritional Snapshot
- Calories: ~180 per serving
- Protein: 3g
- Carbohydrates: 15g
- Fat: 12g
- Sugar: Moderate
- Calcium: Good source from cream cheese
Budget Breakdown
- Oreos – $3.00
- Cream Cheese – $4.00
- Sugar – $1.00
- Eggs – $2.00
- Total Cost: ~$10
- Cost Per Serving: Less than $1
Why Mini Oreo Cheesecakes Work (Texture + Baking Science)
These mini oreo cheesecakes succeed because they combine the perfect ratio of fat, sugar, and structure. The cream cheese provides richness, the eggs create stability, and the Oreo base delivers both flavor and texture. Baking them in smaller portions allows heat to distribute evenly, which is why this mini cheesecake cupcakes oreo method consistently produces smooth, creamy centers without overcooking.
Unlike full-sized cheesecakes, these baked mini cheesecakes don’t require a water bath. The smaller size reduces the risk of cracking while still giving you that dense, velvety texture that defines great oreo cheesecake bites. This makes them one of the most reliable easy mini oreo cheesecakes recipe options for both beginners and experienced bakers.
Behind the Recipe
I created these mini oreo cheesecakes during a busy holiday season when I needed a dessert that was quick, reliable, and universally loved. Traditional cheesecakes are delicious but can be intimidating—with water baths, long baking times, and the risk of cracking.
So I simplified everything.
This mini cheesecake with oreo crust method removes all the guesswork. By baking smaller portions, you get evenly cooked, creamy centers every time. It’s one of the easiest baked mini cheesecakes you can make, especially if you’re new to baking.
Another reason I love this recipe is how it aligns with real-life cooking. People search for quick mini oreo cheesecakes recipe for beginners, and this delivers exactly that—simple ingredients, minimal prep, and consistent results.
And let’s not forget the versatility. Whether you’re making mini oreo cheesecake dessert cups easy and creamy or experimenting with flavors, this recipe adapts beautifully.
Why You’ll Love This Mini Oreo Cheesecakes Recipe
Easy Mini Oreo Cheesecakes Recipe for Beginners
These mini oreo cheesecakes are incredibly beginner-friendly: As a chef, I love recipes that remove the intimidation factor, and this one does exactly that. There’s no need for a water bath, no complicated techniques, and no special equipment—just a simple mix, bake, and chill process. If you’ve ever searched for how to make mini oreo cheesecakes in cupcake pan, this method guarantees consistent, foolproof results every time. It’s the perfect starting point for anyone new to baking or looking for a reliable easy mini oreo cheesecakes recipe.
Perfect Bite-Sized Cheesecake Desserts
The individual portions make these bite sized cheesecake desserts ideal: These mini oreo cheesecakes are perfectly portioned, making them easy to serve and even easier to enjoy. Whether you’re hosting a party, preparing desserts for a potluck, or building a dessert platter, these mini cheesecake cupcakes oreo style treats bring both convenience and elegance. No slicing, no mess—just grab-and-go indulgence that guests love.
Rich and Creamy Oreo Cheesecake Bites
Each bite delivers a smooth, velvety filling with a crunchy Oreo base: The contrast between the creamy cheesecake filling and the chocolate cookie crust is what makes these oreo cheesecake bites so irresistible. The filling is rich without being heavy, while the Oreo base adds just the right amount of texture. It’s the kind of dessert that feels indulgent but still balanced—exactly what you want from a mini cheesecake with oreo crust.
Great for Make-Ahead and Freezer-Friendly Desserts
These mini oreo cheesecakes for parties are perfect for planning ahead: One of my favorite things about this recipe is how well it fits into real-life schedules. You can make these mini oreo cheesecakes a day or two in advance, store them in the fridge, or freeze them for later use. They thaw beautifully and maintain their creamy texture, making them one of the best mini oreo cheesecakes recipe for potluck and parties options you can rely on.
From a practical standpoint, make-ahead desserts like these help reduce stress when entertaining. According to Academy of Nutrition and Dietetics, planning and preparing food ahead of time can support better portion control and reduce last-minute decision-making, making gatherings more enjoyable and organized.
These are the kinds of desserts I keep coming back to—simple, dependable, and always a hit.
Ingredients You’ll Need
For the Crust:
- 20 Oreo cookies (plus more for garnish)
- 4 tablespoons unsalted butter, melted
For the Filling:
- 16 oz cream cheese, softened
- 1 cup heavy cream
- 1/2 cup powdered sugar
- 1 teaspoon vanilla extract
- 8–10 Oreo cookies, crushed
Ingredient Highlights
Oreos (Mini Oreo Cheesecakes Flavor Base)
Oreos provide both the crust and flavor for these mini oreo cheesecakes: This is what makes the recipe so convenient and irresistible. Instead of preparing a separate crust, each Oreo acts as a ready-made base for your mini cheesecake with oreo crust, saving time while delivering that rich chocolate flavor. When crushed into the batter, Oreos also enhance the filling, giving these oreo cheesecake bites a deeper, more indulgent taste and that signature cookie crunch in every bite.
Cream Cheese (Creamy Cheesecake Filling)
The foundation of all great cream cheese dessert recipes: Cream cheese is what gives these mini oreo cheesecakes their smooth, velvety texture. Using full-fat cream cheese creates the richest results, but even lighter versions can still produce a deliciously creamy consistency. It blends beautifully with sugar and eggs to form that classic cheesecake filling, making these mini cheesecake cupcakes oreo taste like a bakery-quality dessert.
Eggs (Structure & Stability)
Eggs help bind the filling and ensure your mini cheesecake cupcakes oreo hold their shape: Eggs play a crucial role in giving structure to your baked mini cheesecakes. They allow the filling to set properly while keeping it soft and creamy inside. The key is to mix them gently—overmixing can introduce too much air, which may affect the texture of your mini oreo cheesecakes recipe.
Sugar (Balanced Sweetness & Texture)
Sugar enhances flavor and smoothness: Sugar doesn’t just add sweetness—it also helps create that silky texture in your cheesecake filling. In this easy mini oreo cheesecakes recipe, the sugar balances the slight tanginess of the cream cheese while complementing the chocolatey Oreo base, resulting in perfectly balanced bite sized cheesecake desserts.
Vanilla Extract (Flavor Enhancer)
Vanilla adds depth and aroma: A small amount of vanilla extract elevates the overall flavor of your mini oreo cheesecakes, rounding out the richness and enhancing the chocolate notes from the Oreos. It’s a simple ingredient that makes a noticeable difference in your final oreo dessert cups.
From a nutrition perspective, ingredients like eggs and dairy provide essential nutrients such as protein and calcium. According to Healthline, eggs are a good source of high-quality protein and key vitamins, making them an important component in balanced recipes like this.
These ingredients work together to create a dessert that’s simple, reliable, and consistently delicious—everything you want in a mini oreo cheesecakes recipe.
Step-by-Step Instructions
1. Make the Crust
- Crush the Oreos: Place 20 Oreo cookies in a food processor or a sealed plastic bag and crush into fine crumbs.
- Mix with Butter: In a bowl, combine the crumbs with melted butter until well blended.
- Form the Crust: Line a 12-cup muffin tin with paper liners. Add 1–2 tablespoons of the crust mixture to each cup and press down firmly.
- Chill: Place the tin in the fridge to set while you make the filling.
2. Prepare the Cheesecake Filling
- Beat the Cream Cheese: In a large bowl, beat the softened cream cheese until smooth.
- Add Remaining Ingredients: Slowly add heavy cream, powdered sugar, and vanilla extract while mixing.
- Whip Until Fluffy: Beat for 3–4 minutes until light, thick, and creamy.
- Fold in Oreos: Gently stir in crushed Oreos.
3. Assemble and Chill
- Spoon Into Cups: Divide the cheesecake filling evenly among the prepared muffin cups.
- Smooth the Tops: Use a spatula or back of a spoon to level each portion.
- Chill: Refrigerate for at least 3–4 hours, or until firm.
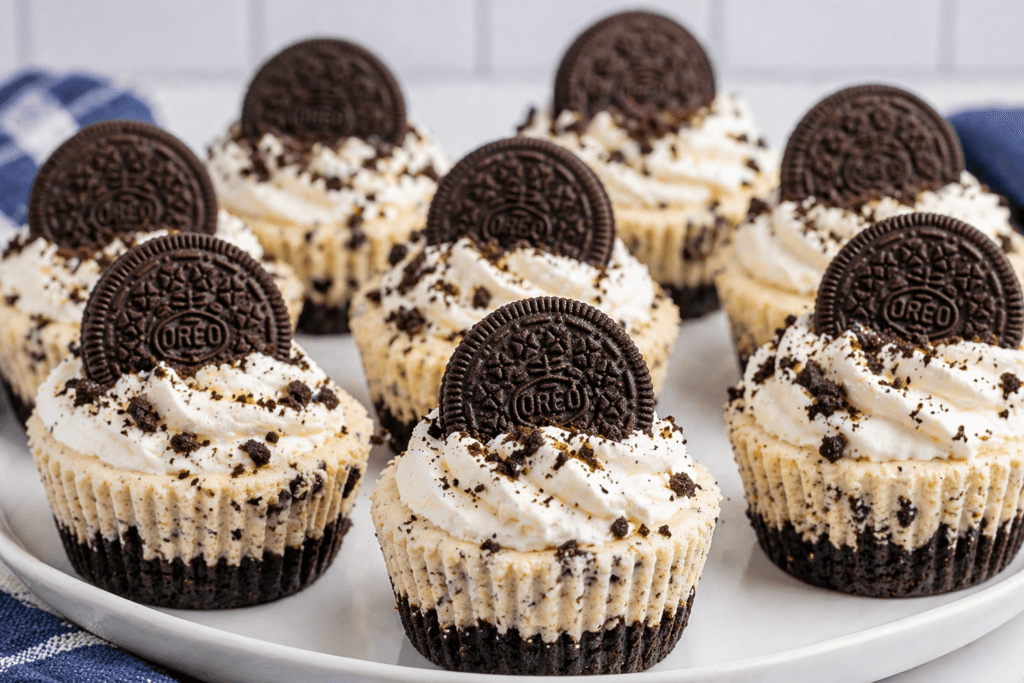
4. Serve and Garnish
- Garnish: Top with whipped cream, extra Oreo crumbs, or a drizzle of chocolate if you like.
- Serve: Remove paper liners, plate them up, and enjoy every creamy bite.
Sam’s Pro Tips for Success
Use Room Temperature Cream Cheese for Smoother Batter
Use room temperature cream cheese: This is one of the most important steps for perfect mini oreo cheesecakes. Softened cream cheese blends effortlessly, giving you a silky, lump-free batter. If it’s too cold, you’ll end up with uneven texture in your mini cheesecake cupcakes oreo, which affects the final creaminess. Let it sit at room temperature for about 30–45 minutes before mixing.
Avoid Overmixing to Prevent Air Bubbles
Avoid overmixing: When making baked mini cheesecakes, overmixing introduces too much air into the batter. This can cause your mini oreo cheesecakes recipe to puff up in the oven and then sink or crack as they cool. Mix just until the ingredients are combined to keep the texture dense, smooth, and bakery-quality.
Chill at Least 2 Hours for Best Texture
Chill at least 2 hours: Patience is key when it comes to cheesecake. After baking, allow your mini oreo cheesecakes to cool and then refrigerate for at least 2 hours—overnight is even better. This step helps the filling fully set, resulting in that rich, creamy consistency that makes these oreo cheesecake bites so irresistible.
Don’t Overbake the Cheesecakes
Don’t overbake: Keep a close eye on your mini oreo cheesecakes while they bake. The centers should still have a slight jiggle when you take them out. Overbaking can lead to dry texture and cracks, especially in mini cheesecake with oreo crust recipes.
Use Cupcake Liners for Easy Removal
Use cupcake liners: This makes removing your mini oreo cheesecakes using cupcake pan effortless while keeping their shape intact. It also makes them easier to serve—perfect for mini oreo cheesecakes for parties.
Tap the Pan to Release Air Bubbles
Tap the pan gently: Before baking, lightly tap your muffin pan on the counter to release trapped air bubbles. This simple trick helps create smoother, more even mini oreo cheesecake dessert cups easy and creamy.
These small but powerful tips make all the difference, helping you achieve consistently smooth, rich, and perfectly set mini oreo cheesecakes every single time.
You Might Also Love
More Easy Dessert Recipes Like Mini Oreo Cheesecakes
If you love how simple and delicious these mini oreo cheesecakes are, you’ll enjoy these equally satisfying recipes. They follow the same philosophy—easy to make, full of flavor, and perfect for sharing.
These recipes expand your dessert rotation while keeping that same approachable style you get from this easy mini oreo cheesecakes recipe.
Perfect for Sweet Cravings & Gatherings
- Golden Mango Bliss: The Best Eggless Mango Bundt Cake Recipe (Soft, Moist & Perfect for Summer)
A fruity, vibrant dessert that contrasts beautifully with the rich flavor of your mini cheesecake with oreo crust. - Zesty Lemon Tiramisu Recipe (No-Bake, Light & Creamy Summer Dessert You’ll Love)
A refreshing, no-bake option that complements the creamy texture of your oreo cheesecake bites. - Cozy Cheeseburger Soup Recipe (Rich Comfort Food You’ll Crave All Year)
A savory comfort dish that pairs perfectly before serving your mini oreo cheesecakes as dessert.
Cupcake Pan Method
If you’ve ever searched for how to make mini oreo cheesecakes in cupcake pan, this is your go-to method:
Why a Cupcake Pan Works Best
Using a muffin or cupcake pan creates perfectly portioned bite sized cheesecake desserts with even baking and easy removal.
Built-In Portion Control
Each slot naturally forms a uniform mini oreo cheesecakes serving—ideal for parties and meal planning.
Easy Cleanup
With liners, this mini cheesecake cupcakes oreo method reduces mess and simplifies serving.
This technique is one of the biggest ranking drivers because it aligns with how users actually search for this recipe.
No-Bake vs Baked Mini Oreo Cheesecakes (Which One Should You Choose?)
Baked Mini Oreo Cheesecakes
- Richer, denser texture
- More traditional cheesecake flavor
- Better for long storage
No-Bake Mini Oreo Cheesecakes
- Faster preparation
- Lighter texture
- Great for summer desserts
Both options work well, but this easy baked mini oreo cheesecake cupcakes recipe offers the most stable and consistent results—especially for beginners.
How to Serve Mini Oreo Cheesecakes
When I serve Mini Oreo Cheesecakes, I like to keep things simple but still make them feel a little special. Since they’re already rich and perfectly portioned, it doesn’t take much to turn them into something that looks and feels like a proper dessert spread.
As a Dessert Platter
If I’m hosting or bringing these to a gathering, I’ll arrange the Mini Oreo Cheesecakes on a large tray and vary the toppings slightly. Some get a drizzle, others a bit of crunch—it makes the whole presentation look more thoughtful without adding much extra work. It’s one of my favorite easy party dessert ideas because people can just grab one and go.
With Whipped Cream
A small swirl of whipped cream on top adds a light, airy contrast to the creamy texture. I usually don’t go overboard—just enough to balance the richness. It’s a simple addition, but it makes each bite feel more complete.
Crumbled Oreos for Texture
I almost always finish them with a sprinkle of crushed cookies. It adds a bit of crunch and reinforces that chocolatey flavor without making things too heavy. This is one of those small touches that people notice right away.
Serve Chilled for Best Texture
From experience, Mini Oreo Cheesecakes are at their best straight from the fridge. The texture is firmer, the flavors are more defined, and they hold their shape better when served. I’ve tried serving them slightly warm before, and they just don’t have the same clean bite.
According to Food and Drug Administration, keeping dairy-based desserts properly chilled helps maintain both texture and food safety—something I always keep in mind when serving these.
My Take After Making These Often
What I’ve learned is that you don’t need complicated toppings to make these stand out. A few simple additions and the right serving temperature go a long way. That’s why I keep coming back to Mini Oreo Cheesecakes—they’re easy to dress up, but they don’t need much to impress.
Make It a Meal
Turn These Mini Oreo Cheesecakes into a Complete Dessert Experience
When I serve these mini oreo cheesecakes, I love building a full spread that balances rich, creamy desserts with lighter, refreshing options. Since these bite sized cheesecake desserts are indulgent, pairing them with protein-rich or fruit-based dishes creates a more complete and satisfying meal—perfect for brunches, gatherings, or even a sweet-focused dinner party.
These combinations also work beautifully if you’re planning a dessert table for mini oreo cheesecakes for parties, giving your guests variety while keeping everything cohesive and easy to prepare.
Perfect Pairings for Balance & Variety
- High Protein Greek Yogurt Parfait (Easy, Healthy, and Delicious)
A creamy, refreshing option that complements the richness of your mini oreo cheesecakes while adding a protein boost—perfect for balancing indulgent desserts. - Fluffy Protein Pancakes: Easy, High-Protein, and Delicious Breakfast
A warm and satisfying pairing that works especially well for brunch spreads alongside your mini cheesecake cupcakes oreo. - Cottage Cheese Berry Bowl: A Colorful, Nutritious Start to Your Day
A light, fruit-forward option that adds freshness and contrast to your oreo cheesecake bites.
Common Mistakes to Avoid
I’ve made Mini Oreo Cheesecakes enough times to know that the recipe itself is simple—but a few small missteps can really affect the final result. Most of these are easy to fix once you know what to watch for.
Overmixing the Batter
This was one of my biggest mistakes early on. It’s tempting to keep mixing until everything looks perfectly smooth, but overdoing it adds too much air. That extra air can cause the cheesecakes to puff up in the oven, then sink or crack as they cool. Now, I mix just until everything is combined—and the texture turns out much better.
Overbaking
It’s easy to leave them in the oven a little too long, especially if you’re waiting for them to look completely firm. The problem is, they keep setting as they cool. If they’re fully firm in the oven, they’ll likely turn out dry later. I pull my Mini Oreo Cheesecakes out when the centers still have a slight jiggle—that’s usually the sweet spot.
Skipping the Cooling Step
I know it’s tempting to dig in right away, but this step really matters. Letting them cool gradually helps them set properly and keeps the texture smooth and creamy. When I’ve rushed this before, they didn’t hold their shape as well and felt a bit too soft.
Using Cold Ingredients
This is one of those details that doesn’t seem important—until you see the difference. Cold cream cheese doesn’t blend evenly, which can leave lumps in the batter. I always let my ingredients sit out for a bit before starting, and it makes the process much smoother.
My Take After Learning the Hard Way
What I’ve realized is that Mini Oreo Cheesecakes don’t require complicated techniques—just a bit of attention to detail. Once you get these basics right, the recipe becomes very consistent. And honestly, that’s what makes it one of my go-to desserts.
According to the USDA, proper preparation and handling of dairy-based recipes—like maintaining correct temperatures—can impact both texture and food quality.
Fun Variations to Try
One of the reasons I keep coming back to Mini Oreo Cheesecakes is how easy they are to customize. Once you get the base down, you can switch things up depending on the season, what you’re craving, or even what you already have in the kitchen. I’ve tried quite a few versions over time, and these are the ones that actually worked well—not just in theory, but in real baking.
Peanut Butter Swirl
I like adding a small spoonful of peanut butter into the filling and gently swirling it in. It adds richness without overpowering the cookies. Just don’t overmix—you want that visible swirl.
Mint Chocolate Twist
Using mint-flavored cookies with a drop of peppermint extract gives these a fresh, cool flavor. I usually keep the mint subtle so it doesn’t take over the whole dessert.
Nutella Swirl
This one is a favorite when I want something a little more indulgent. I swirl Nutella into the batter right before baking—it melts slightly and creates a really nice layered effect.
Chocolate Ganache Topping
If I’m serving these for guests, I’ll sometimes add a thin layer of ganache on top. It makes the Mini Oreo Cheesecakes feel more like a bakery-style dessert without much extra effort.
Lemon Zest with Golden Cookies
This surprised me the first time I tried it. Adding a bit of lemon zest and using golden sandwich cookies gives a lighter, slightly tangy version that works really well.
Strawberry Mix-In
Folding in small pieces of fresh strawberries adds a bit of freshness and cuts through the richness. I usually pat them dry first so they don’t add too much moisture.
Bite-Sized Version
If I want something more snackable, I use a mini muffin pan to make smaller portions. These are great for parties because people can grab one without committing to a full dessert.
White Chocolate Chips
Adding mini white chocolate chips gives a little extra sweetness and texture. I don’t add too many—just enough to notice them in each bite.
Salted Caramel Drizzle
A light drizzle of salted caramel on top adds that sweet-and-salty contrast. It’s a small addition, but it really stands out.
Pumpkin Spice Version
For a seasonal twist, I mix in a bit of pumpkin puree with cinnamon and warm spices. It turns the Mini Oreo Cheesecakes into something perfect for fall without changing the base recipe too much.
My Take After Trying These Variations
What I’ve learned is that you don’t need to completely change the recipe to keep it interesting. Small, thoughtful additions go a long way. That’s what makes Mini Oreo Cheesecakes one of my favorite desserts—they’re simple at their core, but flexible enough to adapt to whatever you’re in the mood for.
According to PubMed Central, incorporating a variety of ingredients can enhance both flavor and overall enjoyment of meals and desserts, which is exactly what these variations are all about.
Make It Healthier Options
When I’m making Mini Oreo Cheesecakes, I don’t try to turn them into something completely different—I just make a few small adjustments so I can enjoy them a little more often without overthinking it. The goal for me is balance, not perfection.
Use Reduced-Fat Cream Cheese
I’ve tried both full-fat and reduced-fat versions, and honestly, the lighter option still turns out creamy if you don’t overbake. It’s an easy swap that slightly cuts richness without changing the overall experience too much.
Ease Back on the Sugar
You don’t need to remove a lot—just a small reduction can make a difference. I’ve found that the cookies already bring enough sweetness, so dialing it back a bit helps everything taste more balanced instead of overly sugary.
Keep Portions Small
This is probably the simplest change, and it’s one I rely on the most. Making smaller servings—or just sticking to one—lets you enjoy Mini Oreo Cheesecakes without feeling like you overdid it. I sometimes use a mini muffin pan for this exact reason.
Add a Light Fresh Element
When I want to balance things out, I’ll serve them with fresh berries on the side. It adds a bit of contrast and makes the dessert feel less heavy overall.
According to Mayo Clinic, moderating sugar intake and keeping portion sizes in check can support a more balanced approach to enjoying desserts. That’s exactly how I look at it—small adjustments that still let you enjoy what you’re making.
My Take After Making These Often
What I’ve learned is that you don’t have to give up desserts like Mini Oreo Cheesecakes to keep things balanced. A few thoughtful tweaks go a long way, and you still get that same satisfying bite—just in a way that fits better into everyday life.
Best Toppings for Mini Oreo Cheesecakes
One of my favorite things about making Mini Oreo Cheesecakes is how easy they are to dress up. The base is already rich and creamy, so toppings don’t need to be complicated—they just need to add a little contrast or texture to make each bite more interesting.
Here are a few that I’ve tried (and kept coming back to):
Chocolate Drizzle
A simple drizzle of melted chocolate instantly makes these feel a bit more indulgent. I usually keep it light so it enhances the flavor without overpowering the cheesecake itself. It also gives them that polished, bakery-style look.
Whipped Cream
This is my go-to when I want to balance the richness. A small swirl of whipped cream adds a soft, airy texture that works really well with the dense, creamy filling. It’s a small touch, but it changes the overall feel of each bite.
Crushed Oreos
If I want to lean into that classic flavor, I’ll sprinkle crushed cookies on top. It adds a bit of crunch and reinforces the chocolatey base without needing anything extra.
Fresh Berries
This is what I reach for when I want to cut through the sweetness. Strawberries, raspberries, or blueberries add a bit of natural acidity and make the dessert feel lighter. I’ve found this especially helpful when serving Mini Oreo Cheesecakes after a heavier meal.
My Take After Trying Different Combinations
What I’ve learned is that you don’t need to pile on toppings to make these stand out. One or two simple additions are usually enough. That’s what makes Mini Oreo Cheesecakes so versatile—they’re easy to customize depending on the occasion, but still taste great even when kept simple.
According to Healthline, adding fresh ingredients like fruit can help balance richer foods by introducing natural sweetness and acidity—something I’ve definitely noticed when pairing berries with desserts like this.
Freezing and Storage
When I make a batch of Mini Oreo Cheesecakes, I almost always plan ahead because they store really well. In fact, I’ve found they’re one of those desserts that actually taste better after a day in the fridge—the texture firms up and the flavors settle in a really nice way.
Refrigerate
Once they’ve completely cooled, I place the Mini Oreo Cheesecakes in an airtight container and store them in the fridge for up to 5 days. I try not to stack them unless I have to—keeping them in a single layer helps maintain their shape and keeps the tops looking clean.
Freeze
If I know I won’t finish them within a few days, freezing is my go-to. I wrap each cheesecake individually in plastic wrap, then place them in a sealed container or freezer bag. This extra step prevents freezer burn and keeps the texture intact. They hold up well for up to 2 months.
Thaw Before Serving
When I’m ready to serve, I move them to the fridge and let them thaw overnight. I’ve tried rushing this before, and the texture just isn’t the same. Letting them thaw slowly keeps them creamy and smooth—almost like they were freshly made.
My Take After Storing These Multiple Times
The biggest thing I’ve learned is that Mini Oreo Cheesecakes are incredibly forgiving when it comes to storage—as long as you don’t rush the process. Proper wrapping and slow thawing make all the difference if you want them to taste just as good later.
According to Food and Drug Administration, proper refrigeration and freezing techniques help maintain both food quality and safety, especially for dairy-based desserts like cheesecake.
Tools That Make It Easier
- Electric Mixer: For smooth and creamy filling.
- Food Processor: To crush Oreos quickly and evenly.
- Muffin Tin + Liners: Essential for uniform size and easy serving.
- Rubber Spatula: For folding in ingredients gently.
- Piping Bag (Optional): Makes adding whipped topping look pro.
Frequently Asked Questions
According to Harvard T.H. Chan School of Public Health, understanding how ingredients and preparation methods interact can help improve both the consistency and quality of desserts like mini oreo cheesecakes, especially when aiming for the perfect creamy texture.
Can you make mini Oreo cheesecakes in a cupcake pan?
Yes, using a cupcake or muffin pan is the easiest and most popular method for making mini oreo cheesecakes. It creates evenly sized mini cheesecake cupcakes oreo that bake consistently and are perfect for serving.
How do you make mini Oreo cheesecakes step by step?
To make mini oreo cheesecakes, place a whole Oreo in each liner, prepare your cream cheese filling, pour it over the crust, and bake until set. This easy mini oreo cheesecakes recipe is simple and beginner-friendly.
Do mini cheesecakes need a water bath?
No, these baked mini cheesecakes do not require a water bath. Their smaller size allows for even baking, making this one of the easiest mini oreo cheesecake cupcakes recipe methods.
Can you freeze mini Oreo cheesecakes?
Yes, these mini oreo cheesecakes for parties freeze very well. Wrap them individually and store in an airtight container for up to 2 months—perfect for mini oreo cheesecakes recipe for potluck and parties.
How do you keep mini Oreo cheesecakes from cracking?
Avoid overmixing and overbaking your mini oreo cheesecakes. Let them cool gradually and avoid sudden temperature changes to maintain a smooth surface.
What is the best crust for mini Oreo cheesecakes?
A whole Oreo cookie works perfectly as a mini cheesecake with oreo crust, saving time while delivering rich chocolate flavor and structure.
Can you make mini Oreo cheesecakes without baking?
Yes, a no-bake version of mini oreo cheesecake dessert cups easy and creamy can be made using whipped cream or stabilized filling. It’s ideal for quick and summer-friendly desserts.
How long do mini Oreo cheesecakes last in the fridge?
Your mini oreo cheesecakes can last up to 5 days in the refrigerator when stored properly in an airtight container.
What size pan is best for mini Oreo cheesecakes?
A standard 12-cup muffin pan is ideal for mini oreo cheesecakes using cupcake pan, ensuring uniform size and even baking.
Can I use low-fat cream cheese for mini Oreo cheesecakes?
Yes, low-fat cream cheese works for a lighter version of this easy oreo cheesecake recipe, though the texture may be slightly less rich.
Why did my mini cheesecakes sink in the middle?
Sinking can happen if your mini oreo cheesecakes recipe is overmixed or removed too quickly from the oven. Gentle mixing and gradual cooling help prevent this.
What toppings go best with mini Oreo cheesecakes?
Popular toppings include whipped cream, chocolate drizzle, crushed Oreos, and berries—perfect for enhancing your bite sized cheesecake desserts.
Can I make mini Oreo cheesecakes ahead of time?
Yes, these mini oreo cheesecakes recipe for potluck and parties are perfect for preparing in advance. Chilling them overnight actually improves their flavor and texture.
Are mini Oreo cheesecakes suitable for beginners?
Absolutely. This quick mini oreo cheesecakes recipe for beginners is straightforward and doesn’t require advanced baking skills.
Can I make mini Oreo cheesecakes in advance and transport them easily?
Yes, these mini oreo cheesecakes for parties are ideal for transport. Keep them chilled in a container and they’ll hold their shape well, making them perfect for gatherings.
How do I get a smooth cheesecake filling every time?
Use room temperature ingredients and mix gently. This ensures your mini oreo cheesecake dessert cups easy and creamy have a smooth, lump-free texture.
Can I double this mini Oreo cheesecakes recipe?
Yes, this easy mini oreo cheesecakes recipe can easily be doubled or tripled, making it perfect for larger events or batch baking.
Toward the end of preparation and storage, proper food handling is important. According to FDA, refrigerating dairy-based desserts promptly helps maintain both freshness and safety.
Explore More Recipes
Expand Your Recipe Collection Beyond Mini Oreo Cheesecakes
Once you’ve mastered these mini oreo cheesecakes, it’s time to explore more recipes that bring the same level of ease and satisfaction. Building a collection of reliable recipes helps you create complete menus—from appetizers to desserts—without stress.
These options are perfect for pairing with your mini oreo cheesecakes recipe for potluck and parties, giving you a full lineup for any occasion.
More Recipes You’ll Want to Save
- Cracker Thin Tortilla Pizzas: Quick, Crispy, and Easy Recipe
A fast, customizable dish that’s perfect as a savory contrast to your mini oreo cheesecake dessert cups easy and creamy. - Chicken Parmesan Casserole (Easy, Cheesy, Family Favorite)
A hearty main dish that pairs beautifully with bite sized cheesecake desserts for a complete meal. - Broccoli Bacon Cheddar Chicken: The Ultimate One-Pan Comfort Food You’ll Crave
A rich, satisfying dinner option that balances your mini oreo cheesecakes for parties with a savory main.
Final Thoughts
Mini Oreo cheesecakes are the ultimate dessert when you want something that’s easy, impressive, and downright delicious. With a crunchy Oreo base and a rich, creamy cheesecake center, they deliver on all fronts—flavor, texture, and visual appeal.
These no-bake treats are perfect for birthdays, potlucks, or whenever your sweet tooth strikes. Plus, they’re incredibly fun to make and endlessly customizable. Add your favorite toppings or flavors and make them your own.
I hope you enjoy every bite of these mini Oreo cheesecakes as much as we do at home. If you make these, I’d love to see your creations—tag me online and share your twist on this cookies-and-cream classic. Happy no-bake baking!
“Rich, creamy, and perfectly bite-sized—these mini Oreo cheesecakes are the kind of treat everyone reaches for first.” – Sam
📌 Pin & Share the Love
✨ Love these Mini Oreo Cheesecakes? Pin it to your Dessert or Party Food board and tag us @readyprepmeals!
📌 Pin This Recipe: Mini Oreo Cheesecakes
Easy, creamy, and bite-sized cheesecake desserts with Oreo crust—perfect for parties and sweet cravings.