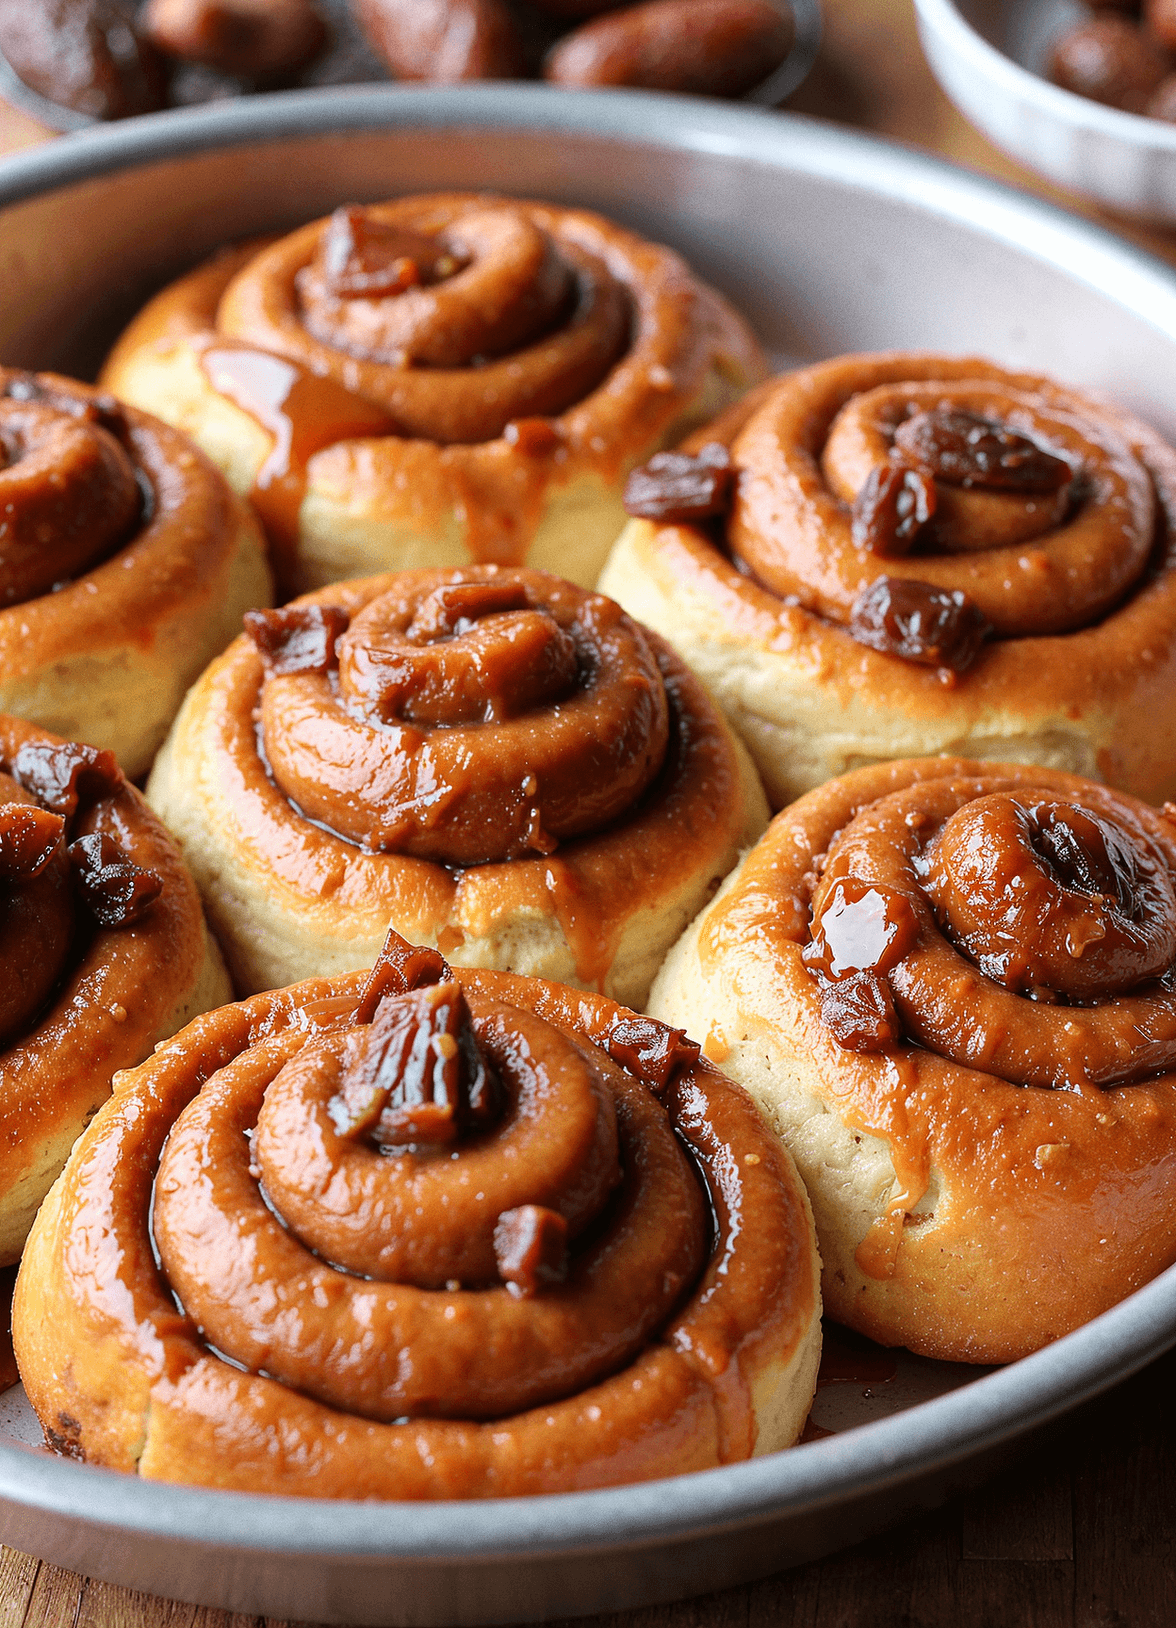
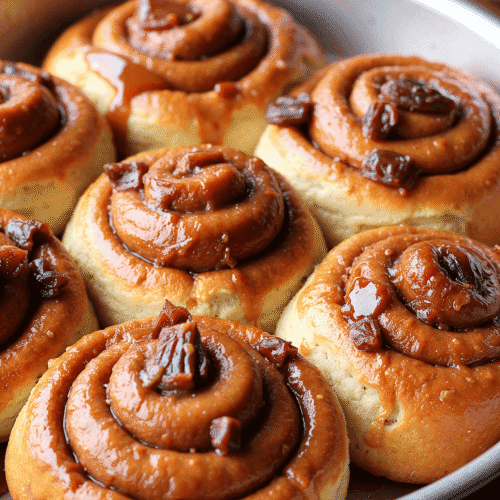
There’s something about cinnamon date sticky buns that makes them feel like a hug on a plate. They’re warm, gooey, fragrant with cinnamon—and typically overloaded with refined sugar. But what if you could have all that indulgent flavor without the sugar crash?
That’s exactly what I wanted when I first started tinkering with this recipe. I was craving sticky buns but wanted a healthier, naturally sweetened option. Enter: dates. These sticky, caramel-like fruits turned out to be the perfect upgrade. And just like that, cinnamon date sticky buns were born—a better-for-you take on the classic pastry that still tastes like pure comfort.
Whether you’re baking for a cozy weekend brunch, a holiday breakfast, or just because you need some cinnamon therapy, this healthy sticky bun recipe delivers everything you want—with fewer regrets.
Recipe Overview
Difficulty Level: Medium
Cuisine: American-inspired baking
Serving Size: 12 buns
Prep Time: 25 minutes (plus rise time)
Cooking Time: 25–30 minutes
What You’re Really Eating: Nutritional Snapshot
These refined sugar-free cinnamon buns are naturally sweetened with dates, giving you flavor and fiber in every bite.
Total Calories (per bun): ~290
Protein: 5g
Carbs: 42g
Fat: 10g
Fiber: 4g
Sugar: 18g (all from natural sources)
Sodium: 160mg
Mood Boost Factor: High—cinnamon and dates are both linked to natural serotonin support.
Note: Use Medjool dates for best texture and sweetness. They blend like butter and bring rich, caramel notes without added sugar.
Ingredients for Cinnamon Date Sticky Buns
These ingredients strike a balance between indulgence and whole-food goodness:
Dough:
- 3 cups all-purpose flour (or half whole wheat, if desired)
- 2 ¼ tsp instant yeast (1 packet)
- ¾ cup warm milk (or unsweetened almond milk)
- ¼ cup melted coconut oil or butter
- 1 egg
- 2 tbsp maple syrup or honey (optional for slightly sweeter dough)
- ½ tsp salt
Filling:
- 1 ½ cups pitted Medjool dates (soft and sticky)
- 1 tbsp water (more as needed)
- 1 tsp vanilla extract
- 2 tsp ground cinnamon
- Pinch of salt
- 1 tbsp coconut oil or softened butter (for spreading)
Sticky Glaze:
- ¼ cup coconut oil or unsalted butter
- ¼ cup maple syrup or honey
- 2 tbsp almond butter or tahini (adds creamy depth)
- Optional: chopped pecans for crunch
How to Make the Best Cinnamon Date Sticky Buns
This recipe is broken into three parts: dough, filling, and glaze. Each step is beginner-friendly if you follow the cues.
Step 1: Make the Dough
In a large mixing bowl, combine the warm milk and yeast. Let it sit for 5 minutes until slightly foamy.
Whisk in the egg, coconut oil, and maple syrup (if using). Add flour and salt gradually, mixing until a soft dough forms.
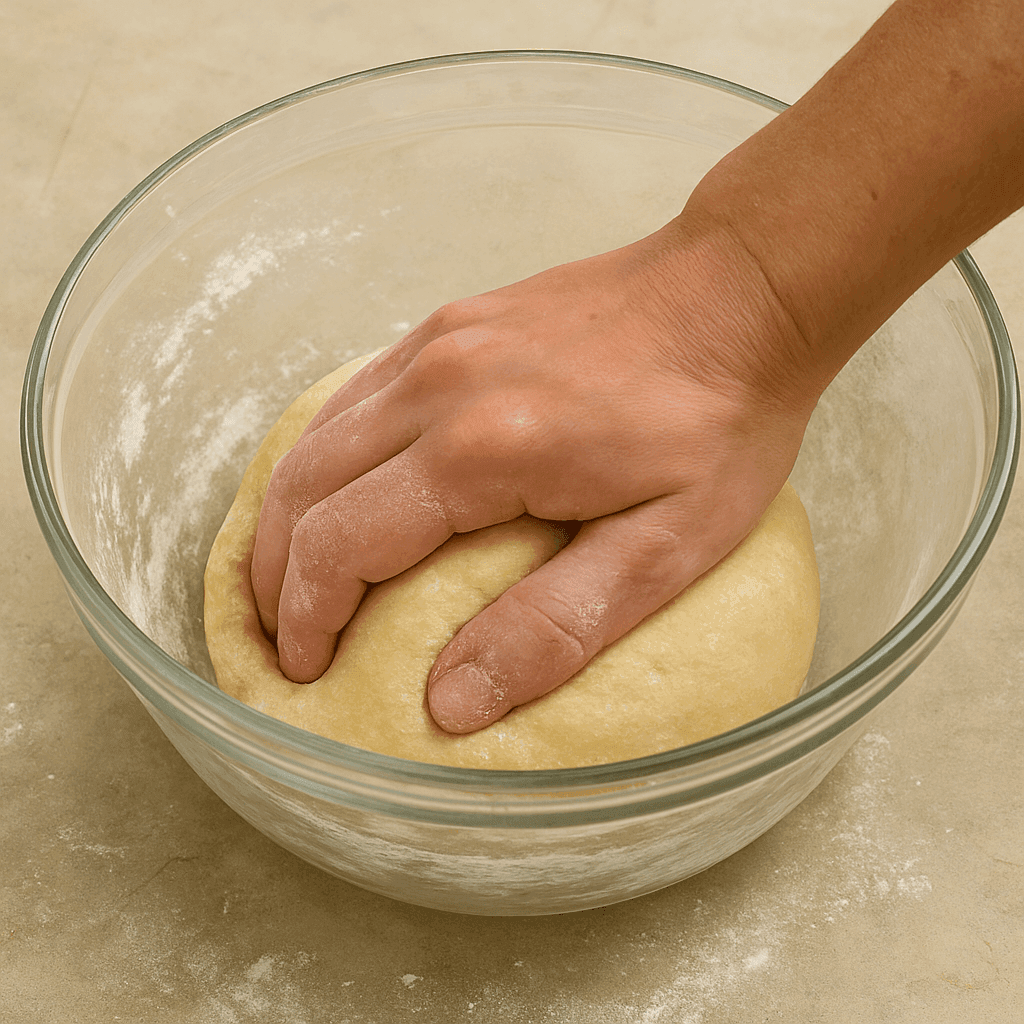
Turn onto a lightly floured surface and knead for 5–7 minutes until smooth and elastic. Transfer to a greased bowl, cover, and let rise in a warm spot until doubled—about 1 hour.
Tip: No time? Use the “proof” setting in your oven or a warm microwave with a bowl of hot water.
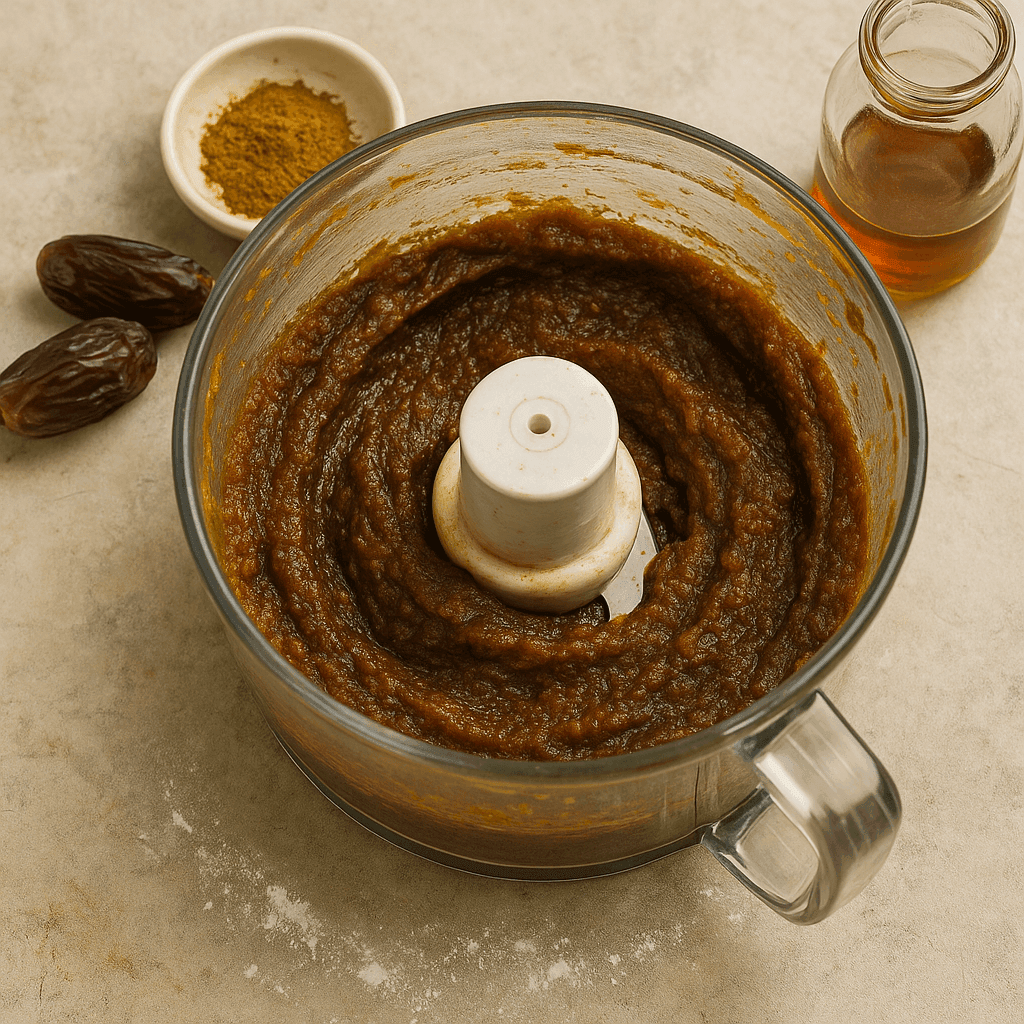
Step 2: Make the Cinnamon Date Filling
While the dough rises, make the filling. In a food processor, blend the dates, vanilla, cinnamon, water, and salt until it becomes a thick paste. Add more water in tiny amounts only if needed for spreadability.
This naturally sweet date paste is what makes this a truly sticky bun sweetened with dates—no need for brown sugar or processed syrups.
Step 3: Roll & Fill the Dough
Once the dough has risen, punch it down and roll it into a 12×16 inch rectangle on a floured surface.
Spread the coconut oil or butter over the dough, then evenly spread the cinnamon date filling across the surface.
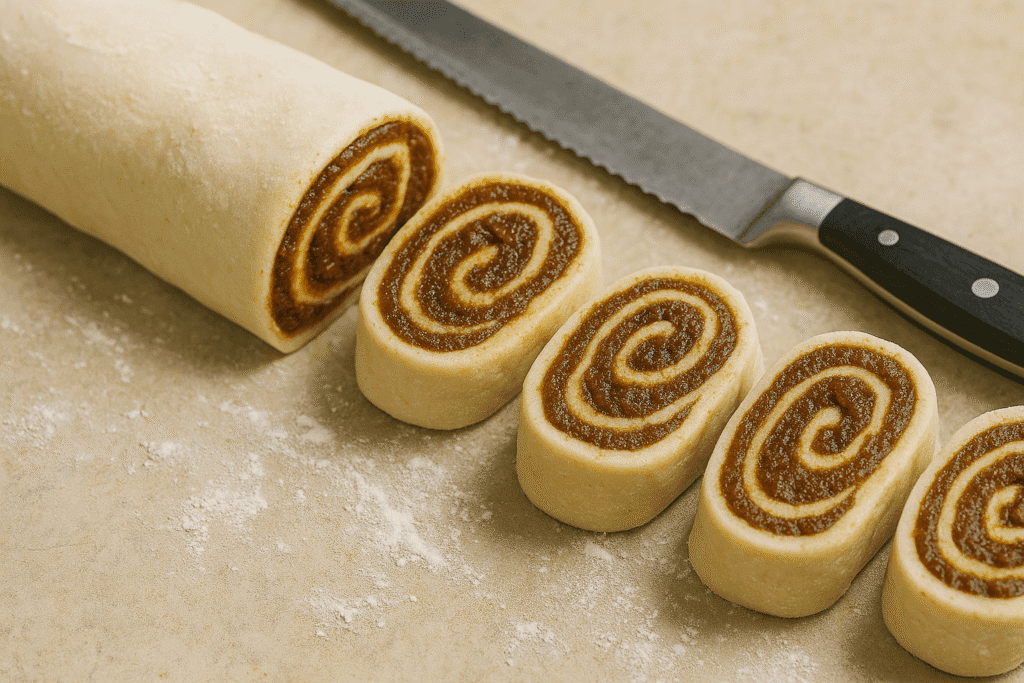
Starting from the long side, roll it tightly into a log. Slice into 12 even pieces using a serrated knife or unflavored dental floss (the secret to clean cuts!).
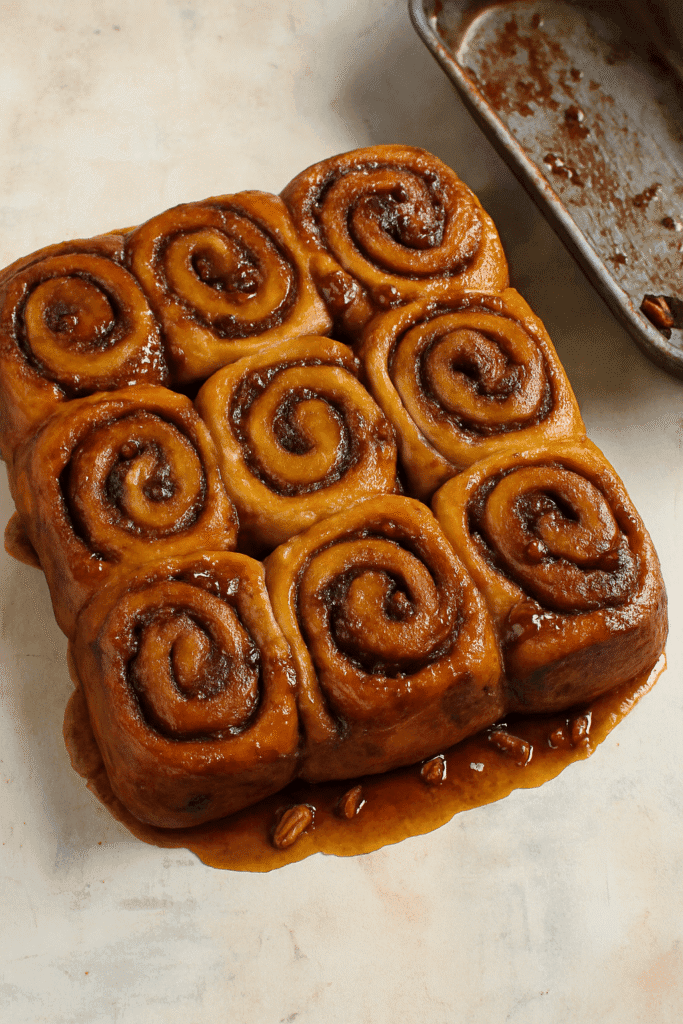
Step 4: Prepare the Glaze & Pan
In a small saucepan, melt the coconut oil, maple syrup, and almond butter until smooth. Pour into a greased 9×13 baking pan.
Optionally sprinkle chopped pecans over the glaze for a nutty surprise.
Place your rolls on top of the glaze, cut side up. Cover and let them rise again for 30 minutes (or until puffy).

Step 5: Bake & Flip
Preheat oven to 350°F (175°C). Bake for 25–30 minutes, or until golden and cooked through.
Let the buns cool in the pan for 5 minutes—no longer!—then flip the whole tray over onto a large cutting board or tray to reveal that glorious sticky layer.
Why You’ll Fall in Love with These Buns
These aren’t your average buns. This cinnamon date sticky buns recipe combines natural ingredients with bakery-quality results.
- Healthier Sweetener: No refined sugar, just dates and a touch of maple.
- Incredible Texture: Fluffy dough meets gooey topping.
- Rich Flavor: Thanks to dates, cinnamon, and nutty glaze.
- Make-Ahead Friendly: Prep the night before and refrigerate before the final rise.
- Crowd-Pleaser: Even picky eaters won’t miss the sugar!
Swaps and Add-Ons
Make this healthy sticky bun recipe fit your lifestyle with these easy variations:
- Gluten-Free: Use a gluten-free baking blend with xanthan gum.
- Vegan: Use almond milk, maple syrup, and skip the egg—add 1 tbsp ground flax + 2.5 tbsp water instead.
- Nut-Free: Skip the almond butter and pecans; use tahini or sunflower butter.
- Extra Sweet: Add chopped dark chocolate or raisins to the filling for a fun twist.
- Spice It Up: Add cardamom or ginger to the filling for a deeper spice profile.
Storage & Reheating
- Store: Keep in an airtight container for up to 3 days at room temperature or 5 days in the fridge.
- Freeze: Wrap individually and freeze for up to 2 months.
- Reheat: Warm in the microwave for 20–30 seconds or in a 300°F oven for 5–7 minutes.
FAQs About Cinnamon Date Sticky Buns
Can I make these sticky buns sweetened with dates without a food processor?
Yes! Soak your dates in warm water for 10–15 minutes, then mash by hand with a fork or blend with a hand mixer.
Can I make these the night before?
Absolutely. Prepare the rolls and place them in the pan with glaze. Cover tightly and refrigerate. Let them come to room temperature before baking.
Are Medjool dates necessary?
They’re ideal because of their softness and caramel-like texture, but Deglet Noor can work if you soak them longer.
Final Thoughts from My Kitchen to Yours
These cinnamon date sticky buns aren’t just a healthier version of a classic—they’re a whole new flavor experience. The sweet richness of dates replaces processed sugar beautifully, while the cinnamon brings warmth and the nutty glaze seals the deal.
They’re sticky, sweet, just the right amount of indulgent—and absolutely unforgettable.
Make a batch for your next brunch, holiday breakfast, or cozy weekend treat. You’ll never look at store-bought sticky buns the same way again.
Cinnamon Date Sticky Buns: A Naturally Sweetened Twist on a Classic
Ingredients
Dough:
- 3 cups all-purpose flour (or half whole wheat, if desired)
- 2 ¼ tsp instant yeast (1 packet)
- ¾ cup warm milk (or unsweetened almond milk)
- ¼ cup cup melted coconut oil or butter
- 1 egg
- 2 tbsp maple syrup or honey (optional for slightly sweeter dough)
- ½ salt
Filling:
- 1 ½ cups pitted Medjool dates (soft and sticky)
- 1 tbsp water (more as needed)
- 1 tsp vanilla extract
- 2 tsp ground cinnamon
- Pinch of salt
- 1 tbsp coconut oil or softened butter (for spreading)
Sticky Glaze:
- ¼ cup coconut oil or unsalted butter
- ¼ cup maple syrup or honey
- 2 tbsp 2 tbsp almond butter or tahini (adds creamy depth)
- Optional: chopped pecans for crunch
Instructions
- Make the Dough:In a large mixing bowl, combine the warm milk and yeast. Let it sit for 5 minutes until slightly foamy. Whisk in the egg, coconut oil, and maple syrup (if using). Add flour and salt gradually, mixing until a soft dough forms. Turn onto a lightly floured surface and knead for 5–7 minutes until smooth and elastic. Transfer to a greased bowl, cover, and let rise in a warm spot until doubled—about 1 hour. Tip: No time? Use the “proof” setting in your oven or a warm microwave with a bowl of hot water.
- Make the Cinnamon Date Filling:While the dough rises, make the filling. In a food processor, blend the dates, vanilla, cinnamon, water, and salt until it becomes a thick paste. Add more water in tiny amounts only if needed for spreadability. This naturally sweet date paste is what makes this a truly sticky bun sweetened with dates—no need for brown sugar or processed syrups.
- Roll and Fill the Dough:Once the dough has risen, punch it down and roll it into a 12×16 inch rectangle on a floured surface. Spread the coconut oil or butter over the dough, then evenly spread the cinnamon date filling across the surface. Starting from the long side, roll it tightly into a log. Slice into 12 even pieces using a serrated knife or unflavored dental floss (the secret to clean cuts!).
- Prepare the Glaze and Pan:In a small saucepan, melt the coconut oil, maple syrup, and almond butter until smooth. Pour into a greased 9×13 baking pan. Optionally sprinkle chopped pecans over the glaze for a nutty surprise. Place your rolls on top of the glaze, cut side up. Cover and let them rise again for 30 minutes (or until puffy).
- Bake and Flip:Preheat oven to 350°F (175°C). Bake for 25–30 minutes, or until golden and cooked through. Let the buns cool in the pan for 5 minutes—no longer!—then flip the whole tray over onto a large cutting board or tray to reveal that glorious sticky layer.